I've only been using Softy for two days, so I'm not making an guarantees as to how well this tutorial will work for you! So far, I've only figured out how to make dingbat type fonts...here's what I've got so far.
For this tutorial, you'll need:
You'll start off with your image. It can be any type, although it's going to end up being a two color black and white bitmap, so keep this in mind when you're making/downloading graphics. You can also make your image free-hand on paper then scan it...the Softy page says that it needs to be scanned in at at least 300 dpi (I haven't tried this yet, but plan to).
Open the graphic in PSP. If it's not black and white, you'll need to make it that way, it would probably be easiest to decrease the color depth, then play around with the color replacer tool until everything you want to show up as "type" is black and the "background" is white. You'll also want a fairly wide background surrounding the "type". I used Image->Add Borders, with the background palette set to white to do this. You can also make your graphic right in PSP, that's what I did for the Geometrics font, I did not use anti-aliasing when drawing the font, I'm not sure if this will make a difference or not in the finished product.
Once you're done fiddling with the graphics, Colors->Decrease Color Depth->2 Colors. Save them as .bmp. You're done with PSP, open Softy.
Now you're ready to begin making your font. In the main Softy window click Select Font Type-> True Type. You'll get the True Type window, click File->New. You'll get a dialog, just click OK, you'll get a second dialog, again click OK. The third dialog is where you'll name your font. Anywhere you see the word "New" put in the name of your font, click OK.
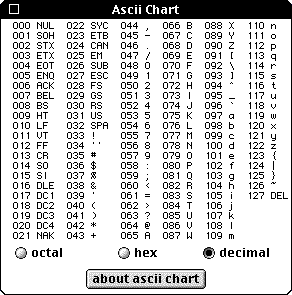
You're ready to start adding "glyphs" to the font. Leave both the main window and the True Type window open, you're going to be going back and forth between them. The first glyph has to be a space, even if there's only one graphic in your font. In the True Type window Click Glyph->New, Glyph Update, you'll see a box become hilighted on the left side of the screen in the third box down. Click Glyph->Map, a box appears that wants a number--this is the ASCII number that will correspond to a key--in this case the number must be 32. Click OK.
Now you're going to add your graphic(s). In the main Softy window (not the True Type window), click on Template->Open, select the first of your bitmaps. It will load in the main Softy window, with a couple of different colored lines, these are used to frame the bitmap correctly. If you look at the far left or top ends of these lines there is a little triangle looking deal--this is what you "grab" with your mouse to move the lines (took me about three tries before I noticed the little buggers!). The turquoise horizontal line is to position the bitmap on the font baseline, I've been leaving this one alone as everything I've loaded so far has been flush with this line. The upper and lower pink horizontal lines define the upper and lower boundaries of the bitmap, anything outside these lines gets clipped. The turquoise vertical line will align the bitmap vertically (imagine that), anything to the left of this line will also get clipped. Now go back to the True Type window (it's easier to see if you maximize it), there is one more line here, a pink vertical line to the right of the image (or more likely going through the image). Move this line to the right if necessary, I've been leaving about as much white space as is to the left of the image.
In the True Type window, click Glyph->Outline Template, if it gives you dialog boxes answer Yes. A line will move across the screen, then a bunch of squares and lines will show up (it's supposed to do this! gave me a bit of a shock the first time). If your image has an inner and outer edge (I don't know how else to word this, like the letter O, there's the outside edge and the "hole" edge), look to see that both edges got outlined. I haven't had it do this yet, but it evidently happens on occasion that the inside edge of the glyph won't get outlines, in the FAQ the author says that if it does happen to click Contour->Clockwise/Counterclockwise to fix it. Click Glyph->Update, a fourth box will appear on the left edge with your new glyph in it. Click Glyph->Map. You need to enter a new character number for it, use 33 (this corresponds to the ! key on your keyboard). Your first glyph is done!
To add more glyphs, do Template->Open again and follow the same steps, with new ASCII character numbers til you've got them all in. Click here to get a listing of the ASCII characters available. Do not use any numbers below 33, this can evidently cause a severe system crash! When everything's added, click File->Save, and pick a name for your font (note: Softy does not support long file names).
You can view your newly created font by finding it in Explorer and double clicking, it will automatically lauch Font Viewer. To use the font, install it from Start->Settings->Control Panel->Fonts.
Here's a shortened version for those who have walked through the whole thing and just need a list to keep things in order: