| |
|
Open the image that you want to turn into a virtual oil painting. Window->Duplicate twice. Close the original image so that you don't accidentally overwrite it. You should have two copies in your workspace. |
|
| |
 |
We'll refer to the two images as Image 1 and Image 2. Make Image 1 active by clicking on its title bar. Colors->Decrease Color Depth->16 Colors. Choose Optimized Median Cut and Nearest Color. Colors->Grey Scale. Colors->Increase Color Depth->16 Million. Effects->Noise->Edge Preserving Smooth, set the value to 30. |
|
| |
 |
Make Image 2 (the color image) active. Edit->Copy. Make Image 1 active. Edit->Paste as New Layer. Image 1 will now have two layers. On the layers palette for Image 1, you will see that the blend mode is set for "normal" click on this to change it to "color". |
|
| |
 |
Make Image 2 (the color image) active again. Colors->Grey Scale. Colors->Increase Color Depth->16 Million. Layers->Duplicate. With the top layer (Copy of Background) still active, Colors->Adjust->Brightness/Contrast. Set Brightness to 18 and Contrast to 33. Change the Blend Mode of this layer to "Difference". Effects->Edge->Dilate. Layers->Merge->Merge All. Colors->Negative Image. |
|
| |
 |
Edit->Copy. Make Image 1 active again. Edit->Paste As New Layer. Change the Blend Mode of this layer to "Burn". |
|
| |
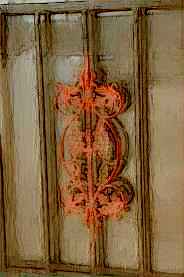 |
You can now close Image 2, you won't be needing it again. Click the bottom layer of Image 1 to make this layer active, it will probably be called "Background", Layer->Promote to Layer. Effects->Artistic Effects->Brush Strokes. Put in the settings as follows: Length 10, Density 25, Bristles 160, Width 2, Opacity 5, Softness 20, Lighting 102, Click on the color swatch to set it to #404040. If the effect is too strong, drag the Opacity slider to the left until you get the effect you want. Here I pulled it down to 73%. |
|